Stepping into the Certified Nursing Assistant (CNA) skills test can feel daunting, but with methodical preparation, it’s your prime opportunity to demonstrate proficiency and confidence. This comprehensive CNA skills test checklist is meticulously designed to serve as your ultimate study partner, transforming a potentially overwhelming exam into a series of manageable, masterable tasks. Forget vague overviews; we are diving deep into the practical, hands-on procedures you will be expected to perform.
This guide moves beyond simple definitions to provide a detailed, step-by-step breakdown of the core competencies you’ll be tested on, from infection control to emergency response. Each section includes a breakdown of critical performance steps, highlights common mistakes to avoid, and offers expert tips to ensure you not only pass but excel.
Think of this article as your personal roadmap. It’s structured to give you a clear, actionable plan for practice and review. By mastering these hands-on skills, you aren’t just preparing for an exam; you are building the essential foundation for a successful and compassionate career as a Certified Nursing Assistant. Let’s transform any test anxiety into solid confidence, one skill at a time.
1. Hand Hygiene and Infection Control
Hand hygiene is the cornerstone of infection control and arguably the most important skill you will demonstrate on your CNA skills test. It’s the first line of defense against the spread of healthcare-associated infections (HAIs), protecting both patients and healthcare providers. This fundamental skill involves performing handwashing with soap and water for a minimum of 20 seconds or using an alcohol-based hand sanitizer correctly when soap and water are not necessary or available.
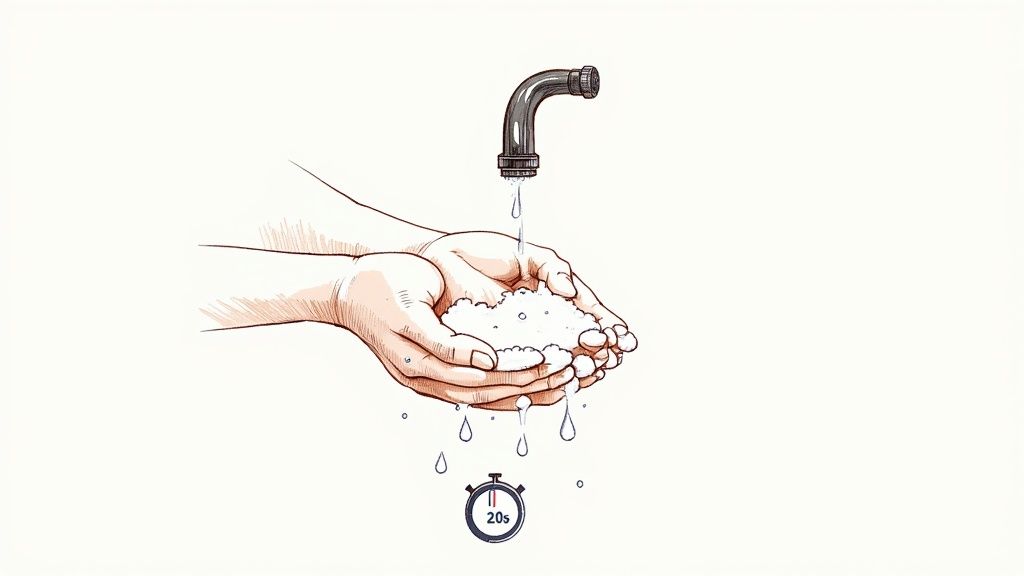
Mastering this for the CNA skills test checklist means knowing how and when to perform hand hygiene. You must demonstrate the correct technique, which includes creating a lather and scrubbing all surfaces: palms, back of hands, between fingers, fingertips, under the nails, and wrists. The impact of proper hand hygiene is profound; for instance, some long-term care facilities have seen significant drops in C. difficile outbreaks after achieving high compliance rates.
When to Perform Hand Hygiene
Evaluators will be watching to see if you perform hand hygiene at all critical moments. Memorize the World Health Organization’s (WHO) “Five Moments for Hand Hygiene” as a guide:
- Before touching a patient.
- Before a clean or aseptic procedure.
- After body fluid exposure risk.
- After touching a patient.
- After touching patient surroundings.
Pro Tips for Test Day
To ensure you pass this critical component, follow these actionable tips:
- Verbalize Your Actions: As you wash your hands, state each step out loud for the evaluator. For example, say, “I am now washing my hands for at least 20 seconds.”
- Time It Right: Silently sing the “Happy Birthday” song twice to ensure you meet the 20-second minimum scrubbing time.
- Nail and Jewelry Check: Before the test, ensure your nails are trimmed short and remove all jewelry from your hands and wrists, as these can harbor microorganisms.
- Avoid Recontamination: Use a clean, dry paper towel to turn off the faucet after washing your hands. This prevents recontaminating your clean hands.
2. Measuring and Recording Vital Signs
Accurately measuring and recording vital signs is a fundamental responsibility you’ll need to master for the CNA skills test checklist. This core skill involves obtaining a patient’s temperature, pulse rate, respiratory rate, and blood pressure to provide a critical snapshot of their health status. It requires precision, proper technique with equipment like manual blood pressure cuffs and digital thermometers, and the ability to recognize and report abnormalities.
Your ability to perform this skill flawlessly is vital for patient safety. Early warning systems in hospitals, for instance, often rely on CNA-recorded vital signs to predict patient deterioration up to 12 hours in advance. Knowing the correct procedures and normal ranges isn’t just about passing the test; it’s about being a vigilant and effective caregiver who can identify potential health crises before they escalate.
When to Measure Vital Signs
An evaluator will expect you to understand the appropriate times to measure vital signs, which often occurs at scheduled intervals or in specific situations. Common scenarios include:
- On admission to a healthcare facility.
- According to a routine schedule (e.g., every 4 hours, once per shift).
- Before and after a surgical procedure or invasive diagnostic test.
- When a patient’s condition changes or they report feeling unwell.
- Before administering certain medications that can affect vital signs.
Pro Tips for Test Day
To demonstrate confidence and accuracy in this skill, keep these practical tips in mind:
- Allow for Rest: Let the patient rest for at least five minutes before taking their blood pressure to ensure an accurate, non-elevated reading.
- Select the Right Cuff: Ensure the blood pressure cuff is the correct size. The bladder should encircle about 80% of the patient’s arm circumference to avoid false readings.
- Count for a Full Minute: If you detect any irregularities in the pulse or respiratory rate, count for a full 60 seconds to get the most precise measurement.
- Record with Precision: Never estimate or round numbers. Document the exact measurements you obtain. Both your practical skills and your theoretical knowledge will be assessed. You can learn more about preparing for the theoretical portion of your CNA exam to ensure you are ready.
- Report Critical Values: Be aware of the facility’s critical value policies and know when a reading requires immediate reporting to the nurse.
3. Proper Transfer and Positioning Techniques
Safe patient transfer and positioning are fundamental skills on the CNA skills test checklist, crucial for protecting both the patient and yourself from injury. This skill set involves moving a resident from one surface to another, such as from a bed to a wheelchair, and correctly positioning them in bed to maintain comfort and prevent complications. Proper body mechanics are at the heart of this skill, ensuring you can perform these tasks safely and efficiently without causing strain.
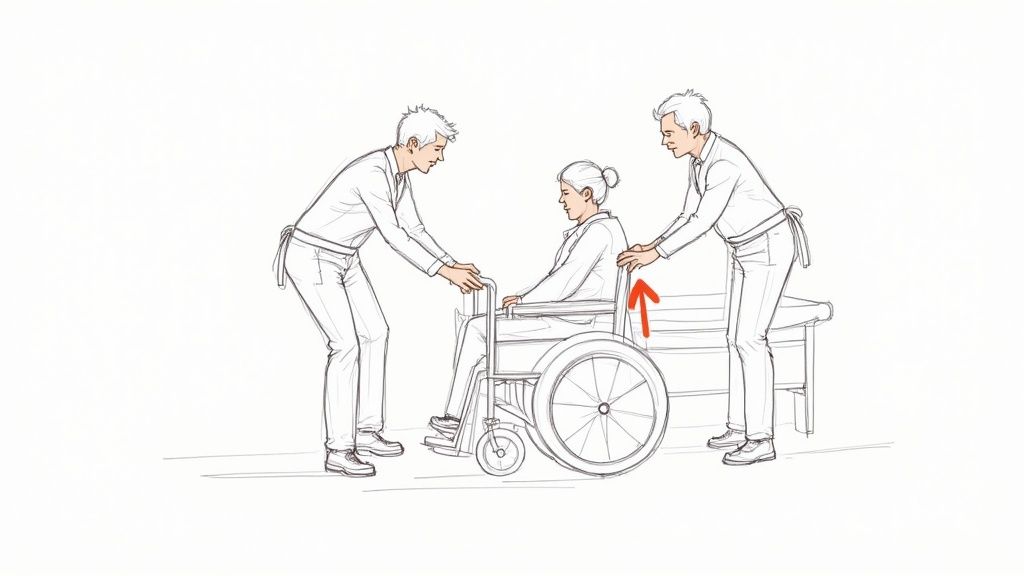
Mastering this for your exam means demonstrating proficiency with tools like gait belts and knowing various techniques, such as the pivot transfer. The impact of these skills is significant; for example, healthcare facilities that implement ‘safe patient handling’ programs have successfully reduced caregiver injuries by 40-60%. Similarly, correctly repositioning patients on a regular schedule is proven to drastically lower the incidence of painful pressure ulcers.
When to Perform Transfers and Repositioning
Evaluators will assess your ability to recognize when and how to move a patient safely. Key scenarios you’ll be tested on include:
- Mobility Assistance: Moving a resident from bed to a chair for meals or activities.
- Toileting: Assisting a resident from a wheelchair to the toilet and back.
- Preventing Complications: Repositioning a bed-bound resident at least every two hours to prevent pressure ulcers, also known as bedsores.
- Improving Comfort: Adjusting a resident’s position in bed or a chair to maintain proper body alignment and relieve discomfort.
Pro Tips for Test Day
To execute this skill flawlessly during your evaluation, focus on these actionable steps:
- Verbalize and Communicate: Clearly explain every step of the transfer or repositioning to the resident before you begin. Use a “count of three” to coordinate the movement together.
- Safety First: Before initiating any transfer, always ensure the brakes on the bed and wheelchair are locked securely.
- Use Your Body Wisely: Keep your back straight, bend at the knees, and keep the resident as close to your body as possible to maintain a stable center of gravity and reduce strain.
- Utilize a Gait Belt: Apply the gait belt snugly around the resident’s waist over their clothing. Use a secure underhand grip on the belt throughout the transfer.
- Know Your Limits: Never attempt to lift a resident alone if you have any doubts about your ability to do so safely. Always ask for assistance when needed.
4. Assisting with Activities of Daily Living (ADLs)
Assisting with Activities of Daily Living (ADLs) is a core responsibility you will demonstrate on your CNA skills test. This broad category covers essential personal care tasks like bathing, dressing, grooming, toileting, and feeding. The key to mastering ADLs is not just performing the task correctly, but doing so in a way that promotes maximum patient independence and maintains dignity. Your ability to provide this support safely, respectfully, and with compassion is a major focus for evaluators.
Successfully passing this portion of the CNA skills test checklist requires balancing direct assistance with encouragement for self-care. It’s about being patient, adapting to the resident’s limitations, and recognizing their personal preferences. The impact of this approach is significant; for example, studies show nursing homes that implement dignity-focused ADL protocols can improve patient satisfaction scores by as much as 35%. You must show you are not just a task-doer, but a compassionate caregiver.
When to Perform ADL Assistance
Evaluators will observe how you approach providing personal care throughout various scenarios. Your assistance will be required at routine times and as needed, always prioritizing the patient’s comfort, safety, and hygiene.
- Routine Care: Typically performed in the morning, before bed, or before and after meals.
- As Needed: When a patient soils themselves, requests help, or shows signs of needing assistance.
- Patient-Centered: Always offer assistance, but respect the patient’s right to refuse care.
- Observation: Use ADL time to observe the patient’s skin, mobility, and overall condition.
Pro Tips for Test Day
To excel in this multifaceted skill area, focus on both the technical steps and the human element.
- Provide Privacy: Always announce what you are doing and ensure privacy by closing the door, pulling the curtain, and only exposing the part of the body you are currently working on.
- Promote Independence: Encourage the patient to do as much as possible for themselves, offering help only where needed. Break down tasks into simple, manageable steps.
- Prioritize Safety: Test water temperature with your inner wrist before bathing. Position the patient upright for feeding and ensure they are wearing any necessary aids like dentures.
- Maintain Hygiene: When bathing, always wash from the cleanest areas to the dirtiest areas (e.g., face before perineal area) to prevent the spread of bacteria.
- Communicate Clearly: Explain every step of the procedure to the patient. This reduces anxiety and fosters a trusting relationship.
5. Catheter Care and Urinary Management
Proper catheter care is a critical responsibility for a CNA, focusing on patient dignity, comfort, and the prevention of infection. This skill involves the routine cleaning of an indwelling urinary catheter, providing meticulous perineal care, and correctly managing the urinary drainage system. On your CNA skills test, you will be evaluated on your ability to perform these tasks safely and hygienically to prevent catheter-associated urinary tract infections (CAUTIs), which are common yet preventable healthcare-associated infections.
Mastering catheter care for the CNA skills test checklist means demonstrating a gentle but thorough technique. You must clean the perineal area and the catheter tubing, always moving away from the insertion site to avoid introducing bacteria into the urinary tract. The impact of correct protocol is significant; hospitals that implement strict CAUTI prevention bundles have seen infection rates drop by as much as 70%, underscoring the importance of your role in patient safety.
When to Perform Catheter Care
Evaluators will expect you to perform and understand the correct timing for catheter care to maintain hygiene and prevent complications.
- Routine Care: At least once per shift or according to the facility’s policy.
- After Incontinence: Immediately after a bowel movement to prevent fecal contamination.
- During Bathing: As part of the patient’s daily bathing routine.
- As Needed: If the area appears soiled or the patient expresses discomfort.
Pro Tips for Test Day
To demonstrate competence and pass this essential part of your exam, focus on these actionable tips:
- Gentle Technique: When cleaning the catheter tubing, hold it securely at the meatus (the point of entry) to prevent pulling or tension, which can cause pain and injury.
- Direction is Key: Always wash the perineal area from front to back (cleanest to dirtiest) to prevent contamination.
- Bag Placement: Ensure the drainage bag is always kept below the level of the patient’s bladder but never touching the floor. This prevents the backflow of urine.
- Emptying Procedure: When emptying the drainage bag, use a clean container and do not let the drainage spout touch the container. Clean the spout with an alcohol wipe before closing it.
- Verbalize Intent: State your actions clearly, such as, “I am securing the catheter to the inner thigh with enough slack to prevent pulling,” to show the evaluator you understand the principles behind each step.
6. Range of Motion (ROM) Exercises
Range of Motion (ROM) exercises are a critical skill for maintaining a patient’s joint mobility and preventing complications from immobility. As a key part of any CNA skills test checklist, this procedure involves moving a resident’s joints through their natural, full range of movement. Performing these exercises correctly helps prevent stiffness, contractures, and muscle atrophy while promoting circulation and overall well-being.
Mastering ROM for your test means demonstrating the proper technique for passive exercises, where you move the joint for the patient. You must show how to support the limb correctly, move slowly and gently, and understand the boundaries of each joint’s movement. For example, some long-term care facilities have reduced resident contracture development by up to 60% by consistently implementing proper ROM programs. Your ability to perform this skill safely and effectively is paramount.
When to Perform ROM Exercises
Evaluators will assess your ability to perform these exercises at appropriate times and with the correct technique, typically when a resident is confined to a bed or chair for long periods. You must demonstrate an understanding of patient comfort and safety above all else.
- During daily care routines like bathing or dressing.
- Before assisting a patient with transfers or ambulation to “warm up” their joints.
- As prescribed in the resident’s care plan, often once or twice daily.
- When a patient has been inactive for an extended period.
Pro Tips for Test Day
To demonstrate confidence and competence in this skill, keep these actionable tips in mind:
- Verbalize Your Actions: Explain what you are doing. For instance, say, “I am supporting the elbow and wrist. Now I will gently bend the elbow.”
- Support Above and Below: Always support the limb on both sides of the joint you are exercising to prevent strain or injury.
- Never Force Movement: Move each joint slowly and smoothly. If you feel resistance or the patient expresses pain, stop immediately and report it.
- Start with the Unaffected Side: If applicable, perform the exercises on the stronger side first. This shows the patient what to expect and can help them relax.
- Follow the Plan: Always adhere to the number of repetitions specified in the care plan, which is typically 3-5 times per joint.
7. Proper Use of Personal Protective Equipment (PPE)
Proper use of Personal Protective Equipment (PPE) is a critical skill for any CNA, safeguarding both you and your patients from the spread of infection. This skill involves more than just wearing gloves; it’s about selecting, putting on (donning), using, and removing (doffing) the right gear, including gowns, masks, and eye protection, based on the anticipated exposure. Understanding and demonstrating this process is a vital part of your CNA skills test checklist.
Mastering PPE protocols is essential for preventing self-contamination and breaking the chain of infection. The COVID-19 pandemic highlighted the life-saving importance of correct PPE use, but its impact is seen daily in preventing other outbreaks. For example, some long-term care facilities have reduced C. difficile transmission by as much as 45% simply by improving PPE compliance among staff.
When to Use PPE
Your evaluator will assess your ability to apply the correct level of PPE based on the situation, which generally falls under standard and transmission-based precautions. You must use PPE when there is any potential for contact with:
- Blood or other potentially infectious materials (OPIM).
- Body fluids, secretions, and excretions (except sweat).
- Non-intact skin and mucous membranes.
- A patient on isolation precautions (contact, droplet, or airborne).
Pro Tips for Test Day
To demonstrate confidence and competence with PPE, focus on these key actions:
- Verbalize the Sequence: Clearly state each step as you don and doff your PPE. For example, “I am now putting on my gown, ensuring it is secured at the neck and waist.”
- Hand Hygiene is Key: Always perform hand hygiene immediately before putting on PPE and immediately after removing it. This is a non-negotiable step.
- Gown and Glove Interface: Ensure the cuff of your gloves goes over the cuff of your gown. This creates a secure barrier with no exposed skin on your wrists.
- Safe Removal: Remember the goal of doffing is to prevent self-contamination. Generally, you remove the most contaminated items first (gloves), followed by eyewear, gown, and mask. Avoid touching the outside, contaminated surfaces of your PPE.
- Don’t Touch Your Face: Be conscious of not touching your face or adjusting your mask or eyewear with contaminated gloves during the skill demonstration.
8. Emergency Response and Choking Intervention
Knowing how to react swiftly and correctly in a crisis is a non-negotiable part of a CNA’s role. This section of the CNA skills test checklist evaluates your ability to recognize and respond to life-threatening situations like choking, falls, or a sudden change in a patient’s condition. You will be expected to demonstrate how to summon help using the call system, provide immediate care like the Heimlich maneuver, and maintain patient safety until a nurse or emergency team arrives.
Mastering emergency response for your exam means acting with both speed and composure. Your prompt intervention can be life-saving; for example, a CNA performing the Heimlich maneuver correctly in a dining hall can prevent a resident from choking to death. A quick response to signs of a stroke, like sudden weakness, can significantly improve a patient’s outcome.
When to Perform Emergency Response
Evaluators will assess your ability to recognize the signs of an emergency and take immediate, appropriate action. Key scenarios include:
- When a resident is choking and cannot speak, cough, or breathe.
- When a resident suddenly collapses or becomes unresponsive.
- After a resident has fallen and may be injured.
- When you observe a sudden, drastic change in a resident’s physical or mental state.
- During facility-wide emergencies like a fire or natural disaster.
Pro Tips for Test Day
To demonstrate competence and confidence during an emergency scenario, focus on these key actions:
- Stay Calm, Act Fast: Your first step is to remain calm to think clearly. Immediately call for help but never leave the patient alone.
- Assess for Choking: Before performing the Heimlich maneuver, ask the conscious person, “Are you choking?” If they can’t respond, proceed. Stand behind them, make a fist above their navel, and perform quick, upward abdominal thrusts.
- Know Your Facility: Be aware of the location of emergency equipment like the crash cart or AED. This knowledge is crucial for assisting the response team.
- Document Everything: After the situation is stabilized, you must accurately document the event and every action you took, which is a critical part of your legal and professional responsibility. For those interested in diverse work environments, knowing these protocols is essential.
CNA Skills Test: 8-Point Checklist Comparison
| Skill / Aspect | Implementation Complexity ? | Resource Requirements ⚡ | Expected Outcomes ? | Ideal Use Cases ? | Key Advantages ⭐ |
|---|---|---|---|---|---|
| Hand Hygiene and Infection Control | Low – straightforward steps but requires consistency | Minimal – soap, water, sanitizer, paper towels | Significant infection reduction in healthcare settings | Any patient contact, infection prevention | Most effective in preventing infections; cost-effective |
| Measuring and Recording Vital Signs | Moderate – requires training and attention to detail | Moderate – calibrated equipment (BP cuff, thermometer, oximeter) | Early detection of patient deterioration; baseline data | Regular patient monitoring; acute and chronic care | Objective health status data; early warning of problems |
| Proper Transfer and Positioning Techniques | Moderate to High – requires physical skill and assessment | Moderate – gait belts, mechanical lifts if needed | Prevents injuries, maintains mobility, reduces falls | Moving or repositioning patients; fall prevention | Protects patients and caregivers; preserves mobility |
| Assisting with Activities of Daily Living (ADLs) | Low to Moderate – routine but time intensive | Minimal – personal care items, adaptive aids | Maintains hygiene, dignity, and patient comfort | Bathing, dressing, feeding, toileting assistance | Promotes dignity; prevents complications; therapeutic |
| Catheter Care and Urinary Management | Moderate – requires sterile technique and vigilance | Moderate – catheters, drainage bags, cleaning supplies | Prevents urinary tract infections and skin breakdown | Patients with indwelling catheters; urinary monitoring | Accurate fluid balance; infection prevention |
| Range of Motion (ROM) Exercises | Moderate – requires knowledge of techniques | Minimal – caregiver assistance, space | Prevents contractures, promotes circulation | Immobile or post-surgical patients; rehabilitation | Maintains joint function; reduces complications |
| Proper Use of Personal Protective Equipment (PPE) | Low to Moderate – multiple steps, technique sensitive | Moderate – gloves, gowns, masks, respirators | Protects against infections; reduces cross-contamination | Infection control situations; exposure to bodily fluids | Protects caregiver and patients; reduces infection spread |
| Emergency Response and Choking Intervention | High – high stress; requires quick decision-making | Minimal – knowledge and access to emergency systems | Life-saving interventions; rapid response | Choking, cardiac arrest, falls, sudden illness episodes | Saves lives; builds emergency confidence |
From Checklist to Competence: Your Next Steps
You’ve now worked through a comprehensive breakdown of the core competencies required for your examination. This detailed CNA skills test checklist has illuminated the specific actions, critical checkpoints, and underlying principles for each task, from foundational Hand Hygiene to life-saving Choking Intervention. We’ve moved beyond a simple list, dissecting the “why” behind every step, emphasizing patient safety, communication, and dignity as the cornerstones of effective care.
The journey from reviewing these points on a screen to performing them flawlessly under pressure is paved with deliberate, hands-on practice. The true value of this checklist isn’t in memorization alone, but in its application. It serves as your roadmap for transforming theoretical knowledge into muscle memory and confident, second-nature execution.
Bridging Theory and Practice
Mastering the mechanics of each skill, such as accurately measuring blood pressure or executing a pivot transfer, is only half the battle. Your state evaluator is looking for a holistic demonstration of competence. This means integrating key principles across every task you perform.
Remember these universal takeaways that apply to nearly every skill on your test:
- Verbalize, Verbalize, Verbalize: Clearly state what you are doing and why. Explain the steps to the patient actor as you perform them. This demonstrates your understanding and keeps the patient informed, a critical aspect of person-centered care.
- Prioritize Safety and Dignity: Before any physical interaction, ensure the environment is safe. This includes locking bed wheels, lowering the bed to a safe height, and checking for trip hazards. Always protect the patient’s privacy by closing curtains and using drapes appropriately.
- Confirm and Communicate: Always begin by introducing yourself and confirming the patient’s identity. End each skill by ensuring the patient is comfortable and placing the call light within their reach. This completes the circle of care for that specific task.
Key Insight: Your ability to blend technical precision with empathetic communication is what separates a proficient test-taker from a truly competent caregiver. The skills test is designed to assess both.
Your Action Plan for Success
Treat this CNA skills test checklist not as a passive document but as an active training tool. Use it to structure your study sessions and mock exams. Partner with a classmate or use a mannequin to simulate the test environment. As you practice, have your partner use this checklist to provide feedback, ensuring you don’t miss any of the critical checkpoints.
Focus on the skills you find most challenging. If catheter care feels intimidating, break it down and practice the sequence of steps until it becomes routine. If you struggle with remembering the order of vital signs, create a mnemonic device. Consistent, targeted rehearsal is the key to building the confidence needed to walk into your exam and perform at your best. This preparation isn’t just about passing a test; it’s about building the foundational expertise that will define your career and ensure the well-being of every patient you have the privilege to serve.
Ready to take the next step and find the perfect training program to put these skills into practice? The CNA Guide offers a comprehensive, state-by-state directory of approved CNA classes to help you start your journey. Visit The CNA Guide to easily locate and compare top-rated programs in your area today.